Transferring new columns
Objective: Transfer new* columns from Excel to ArcGIS or vice versa. This functions in a very rapid and convenient manner, but please first read through the following instructions, so that the GISconnector for Excel works in exactly the way that you intend it to.
* "New" in this context always means that the relevant column does not exist on its respective opposite side. In the narrower sense, the column does not have to be new.
Prerequisite
If you have not yet applied a connection, you have the following three possibilities for doing so:
The same workflows to establish a connection are available from
the Excel side, too:
Using the menu “Number” in the index "Home", you can set the format of your Excel columns.

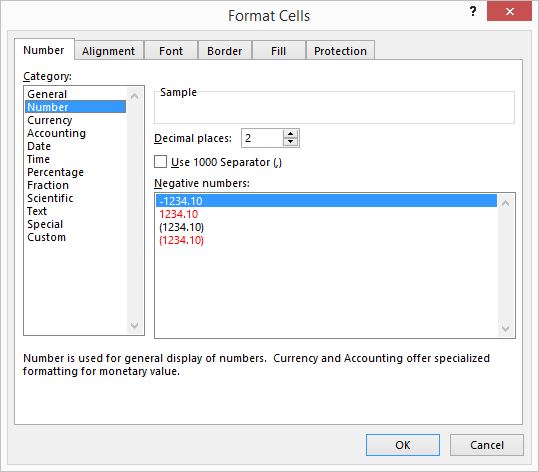
Greater speed and precision can be achieved when setting the data type with the "Format cells" menu, reached by clicking on the small button  "Format cells: Number" to the lower right in the "Number" menu.

The following should be noted when setting the Excel data type:
-
The GCEX_ID-column in Excel must only be formatted as a whole number without a decimal point, otherwise the data and function transfer with ArcGIS will not work.
-
In general, all cells of an Excel column must have the exact same data format to enable correct operation of the GISconnector for Excel.(If, for example, one part of the cells of a column is formatted as ‘Text’ and another part is formatted as ‘Standard’, an error message will result.)
-
If you set the column format to "Number" in the Excel Ribbon "Home" via the group "Number" from the drop-down menu, the column is always formatted to a number with two decimal places. (see the graphic above in the menu "Format cells". If you require a whole-number column (Integer or Long-Integer), reduce the standard of "two decimal places" to "no decimal places" by using the menu represented above, or delete the decimal places with a double click on the button
 "Delete decimal place" in the menu "Number".
 -
The Excel format "General" will be transferred to ArcGIS as a text column
-
If you wish to calculate the content of an Excel column with a text function (e.g., for a label in ArcGIS), you must always format the column in Excel as "General" to ensure both that Excel performs your formula calculation, and that the result of the calculation can be correctly transferred to ArcGIS as text.
1. Transfer new* columns from Excel to ArcGIS
1.1 Enter a new* column in Excel by giving a new title to the first cell of the first empty column to the right of your data area. Because you subsequently wish to transfer the column to ArcGIS, you must observe the conventions for the allocation of field names in ArcGIS.
1.2. Now format your Excel column with the desired data type. To do this it is best to mark the whole column (check that the data are not filtered, otherwise the formatting will only operate on those cells visible at the time) and then select the desired data type in the Excel tab "Home" using the menu group "Number".
1.3 In the Connection settings activate the transfer of the new* column(s) from Excel to ArcGIS respectively let the GISconnector for Excel manage the column. In the index "Options" you can apply a setting for each connection to determine whether new* columns (in ArcGIS or in Excel) should be managed as standard by GISconnector for Excel, and hence taken into consideration for the transfer, or not. The setting after the installation is for new* columns to be managed by GISconnector for Excel in both transfer directions.
1.4 You can now either create an empty column in ArcGIS or with content generated in Excel. Then click on one of the three following buttons in accordance with your requirement:
Irrespective of which button you activate, your new* column(s) is(are) created for you in ArcGIS and filled with content where applicable.
2. Renaming fields in ArcGIS using the GISconnector for Excel
2.1 Change the name of a column in Excel, though the data format of the column may not be altered in version 1.2 of the GISconnector for Excel.
2.2 Transfer the column with due regard for the settings under Columns/fields and for the Options from Excel to ArcGIS. Both the renamed column on the source side (Excel) and the field with the old name in ArcGIS on the target side must be activated respectively managed by the GISconnector for Excel. In addition, it must be permitted in the Options for columns in ArcGIS to be deleted that are no longer available in Excel.
2.3 Upon transfer, the GISconnector for Excel deletes the old column in ArcGIS (this is no longer available in Excel because it has been renamed) and creates the new*, or just the renamed, column with the same content in ArcGIS for you.
3. Transfer new* columns from ArcGIS to Excel
3.1 Apply a new column in ArcGIS
3.2 In the Edit connection settings activate the transfer of the new column(s) from ArcGIS to Excel respectively let the GISconnector for Excel manage the column . In the index "Options" you can apply a setting for each connection to determine whether new columns (in ArcGIS or in Excel) should be managed as standard by GISconnector for Excel, and hence taken into consideration for the transfer, or not. The setting in accordance with the installation is for new columns to be managed by GISconnector for Excel in both transfer directions.
3.3 Fill in your column with content as required (e.g. by calculating the area) and then click on one of the three following buttons in accordance with your requirement:
Irrespective of which button you activate, your new column(s) is transferred to Excel with respect to the settings "Columns/Fields" and "Options".
