Requirements in Excel
Transfer new* columns from Excel to ArcGIS. This operates quite fast and convenient. Nevertheless please read through the following instructions first in order for the GISconnector for Excel working exactly the way you intend it to.
Formatting columns in Excel
Using the menu “Number” in the index "Home" you can set the format of your Excel columns.

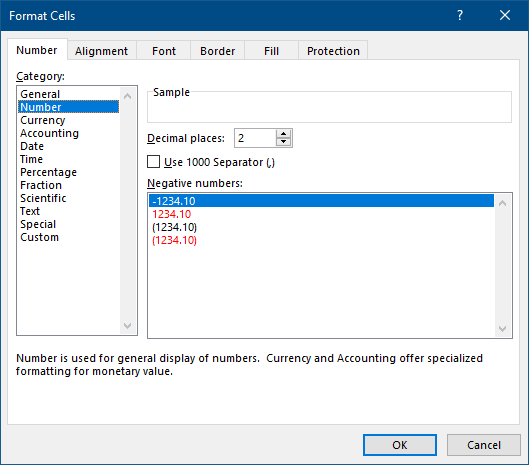
You can set the data type faster and more precisely with the "Format cells" menu, by clicking on the small button  "Format cells: Number" to the lower right in the "Number" menu.
The following should be considered when setting the Excel data type:
-
The GCEX_ID column in Excel must only be formatted as a whole number without a decimal point, otherwise the transfer of data and sending of functions with ArcGIS will not work.This setting will be set automatically while creating a connection. It is best, if you do not make any changes in the GCEX_ID column.
-
In general, all cells of an Excel column must have the exact same data format to enable correct operation of the GISconnector for Excel.(If, for example, one part of the cells of a column is formatted as ‘Text’ and another part is formatted as ‘General’ an error message will result.)
-
When providing an incorrect column name GISconnector now suggests a corrected version of the name.
-
If you set the column format to "Number" in the Excel Ribbon "Home" via the group "Number" from the drop-down menu the column is always formatted as a number with two decimal points (see the graphic above in the menu "Format cells").If you require a whole-number column (Integer or Long Integer), reduce the default of "two decimal places" to "no decimal places" by using the menu represented above, or delete the decimal places with a double click on the button
 "Delete decimal place" in the menu "Number".From GISconnector version 2.1 on the program is more tolerant when transferring number formatted columns/fields.Any combination of number formatted column and field will be accepted. This feature is optional and can be configured in the
 "Settings" in the tab "Advanced".
 -
When using an Excel column with format 'General' a warning appears, as this format is not distinct and can't be interpreted for sure.This helps preventing compatibility issues. Instead use distinct column formats (e. g. "Text" or "Number").
-
If you wish to calculate the content of an Excel column with a text function (e.g. for a label in ArcGIS), you must always format the column in Excel as "General" while calculating.In order to transfer your data to ArcGIS you have to format your column to "Text" after calculating.
Transfer new* columns from Excel to ArcGIS
1. Enter a new* column in Excel by giving a new title to the first cell of the first empty column to the right of your data area. Since you wish to transfer the column to ArcGIS subsequently, you have to pay attention to the conventions for the denomination of field names in ArcGIS.
2. Now format your Excel column with the desired data type. In order to do this it is best to mark the whole column (keep in mind that the data should not be filtered, otherwise the formatting will only operate on the cells visible at the time) and then select the desired data type in the Excel tab "Home" using the menu group "Number".
3. Activate the transfer of the new* column(s) from Excel to ArcGIS in  "Edit connection" respectively let the GISconnector for Excel manage the column. In the index "Options" you can apply a setting for each connection to determine whether new* columns (in ArcGIS or in Excel) should be managed as default by the GISconnector for Excel, and hence taken into consideration for the transfer, or not. The default setting for new* columns is to be managed by GISconnector for Excel in both transfer directions.
4. You can now either create an empty column in ArcGIS or you can fill the new* column with content in Excel before. Then click on one of the three following buttons in accordance to your requirement:
Regardless of which button you activate your new* column(s) is(are) created for you in ArcGIS and filled with content where applicable.